Home

Monday, May 30, 2011

Handmade Mei Tai Baby Carrier

Ok, so I have two daughters that are 2 and 3 years old. They are at the age where they are too little to walk far distances, too big to be carried for very long and too little to walk anywhere fast. We have all the equipment needed to get these 2 from point A to point B- jogging stroller, a sit and stand stroller, umbrella strollers and even a bike trailer. But I was stumped when faced with a trip to go hiking with my husband's family. So I got online to buy some type of back carrier for the girls. I wasn't prepared for the cost though, have you ever priced one? Crazy, anyway so I got cracking at making one of my own!

man wearing handmade mei tai carrier for toddler


The Mei Tai looked to be the best one to replicate, it has no snaps, hooks, etc and it says that it is good for children up to 4 years old. It is just fabric and it ties around you and the baby. Here is the actual brand named one:
TogetherBe Freehand Mei Tai Baby Carrier in Marie Pattern TGB1010
and here is how it looks with a bigger kid in it:
Older children in Boba Toddler Carriers Backpack style


Ok, so here is how I made one...
1. Make pattern: I didn't make a head rest or neck support for mine since my kids are big now. If you are wanting to make this for a baby and grow with your child you might need to make the back arch up instead go straight across. Here are my measurements:
pattern for making Mei Tai baby carrier
This is kind of typical measurements and what I used for the first one I made but for the 2nd, for my oldest daughter, I made the whole thing longer, around 24 inches instead of 20, because I thought it didn't go up high enough on her back.

2. Cut out straps: cut 3 of them (2 shoulder and 1 waist) 10 inches wide by 80 inches long.

3. Cut out the padding for the straps (I used quilting batting): I cut out 8 pieces (4 will be stacked together for each shoulder strap) that are 5 inches by 22 inches long.  And 4 pieces that are 5 inches by 28 inches long.

4. Cut out body pieces ON FOLD: you will need 3 of them- one for the inside (where the baby sits), one for the outside (that everyone will see) and an inside layer for durability.

5. Assemble the padding: place 4 pieces of the same size together and sew a basting stitch so they stay in place. You should have 3 padding bundles when you are done.

6. Make straps: Fold straps in half, right sides together and sew the length. When done flip them right side out and iron them flat. You should finish with 3 long straps, one for the waist and 2 for the shoulders.

7. Insert the padding: Place the padding in the two shoulder straps about 5 inches from the opening. Place the last bundle of padding in the waist section in the dead center. (I used a safety pin with a string tied to it to pull the padding into the center)

8. Sew the long strips 2 times lengthwise through the center.

9. Layout body pieces like this:
Pattern for making a Mei Tai baby carrier
with the straps sticking out the top by 5 inches and right sides of the inside and outside pieces together.

10. Stitch all around the body piece leaving the bottom open: I stitched twice across the straps just for durability.

11. Flip body to right sides out.

12. Tuck in the bottom and sew all around the body piece.

13. Sew the straps inside the body piece: with a square and "x" to help reinforce.
pattern for making a Mei Tai baby carrier

14. Center the waist strap with the center of the body piece and sew a square around the piece.

15. You are done!!
Handmade Mei Tai baby carrier

Make your own Mei Tai baby carrier


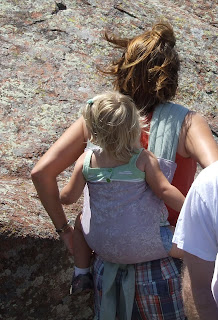
They worked great! We are going to take them to a beach trip and camping trip that we have planned for this summer!
woman wearing handmade Mei Tai baby carrier
back of a handmade Mei Tai baby carrier

Thursday, May 26, 2011

Personalized Nursery Art


So I have painted a few murals and smaller nursery art for the walls of not only my own kids rooms but also for some family and friends. Here are a few of my favorites:


So when I saw the Lil Blue Boo post of Personalized Nursery Art I thought it would be right up my ally. So for a (kind-of) sister-in-law (she is my husband's cousin's wife) who has already decorated her nursery I thought the smaller sized personalized art piece would be a great addition to my gift for baby Smith.

Instead of using hardboard which would cause me to use a saw and drill, I used smooth Bristol board which is easier to cut and punch holes in. Then I just used acrylic paints and a very thin paint brush!!

Thanks for the great idea Lil Blue Boo!

Thursday, May 19, 2011

Refashion Pajama Pants into 2 Pairs of Pajama Shorts!!

We live in Texas and we spend almost 3/4 of the year in shorts, so when I found 4 pair of nice pajama pants at a thrift store and thought they would better serve me as pajama shorts... but what to do with the left over pant pieces? Make a kids pair of pajama shorts!

sorry about the photos, my 7 year old took them...

 So you start off with the pants and cut off the length that you want your shorts to be a hem.
Then you cut the extra leg pieces, using a pair of kids shorts as a pattern I cut 2 front short pieces and 2 back short pieces.
Sew them one front and one back together at the small side seams.
Lay them on top of each other, right sides together, and sew the center arch together- I sew twice to make a studier seam since this is what usually pulls apart.

Flip the shorts around so that the center half circle you just sewed are on the front and back of the shorts and sew down the out sides of the shorts. Roll the top over leaving room for your elastic and you're done!

A matching pair of PJ's!

Wednesday, May 18, 2011

Mad Hatter Party!!

So, my little sister turned 30!! and she threw herself a Mad Hatter Tea Party. I wanted to make the girls something special to wear to the party but not really a costume so that they could wear it other than just this one time. So here is what I came up with:
Inspired by the Queen of Hearts

Inspired by Alice herself


The boys were Tweedle Dee and Tweedle Dumb.
Their hats were pretty easy, I just used some scrap fabic to make 5 triangles (size depends on the size of their head) and after sewing them together I just put the hat onto their heads and pinned it to fit exactly. Then I stuck a pipe cleaner with a cardboard propeller through the top.

and I went as the Mad Hatter... 

The hat was just made out of cardboard and covered with fabric. Not the most durable hat but I only needed it for the night!


Great fun!!

Saturday, May 14, 2011

Make a Man's Tie into a Velcro Kid's Tie...

So, my littlest J's church dedication was on Mother's Day. For my oldest daughter I made her a dress (post coming) and for my son I wanted to make him something special to mark the occasion. At first thought that I would knit him a vest but I didn't have enough time. So I thought: a TIE!
I scoped out a few tutorials online to make him one but when I went to my favorite thrift store for a sale and found some ties cheap and I figured I could figure out how to resize them to make them fit a 7 year old and make it with Velcro so we didn't have to tie it.
So here is how I did it.

Here is the tie:


I cut it into 5 pieces, the front piece, the back piece, the 2 neck straps and a piece to make the fake tie. My son  is 7 and I made the pieces: 15 inches for the front piece, a little shorter for the back piece, 7.5 inches for the neck straps, and 6 inches for the fake knot.

Next, make the tie thinner. I usually don't iron, even when a pattern calls for it just because I don't think it is necessary, and I hate ironing, I mean I NEVER iron, I don't even own an ironing board (the only reason I own an iron is for craft projects, I know Mother I am a disapointment).
Anyway this project you really do have to take the time and iron. So, fold the tie to the width you want and iron one side...

Then the other. Now if you are making the tie for a smaller child you will have to cut the extra off the side and iron under the cut edge but for mine I didn't really need to. 

Next take the fake tie piece... 


 Fold one side and then the other to the back, then the other,


 then tuck in the raw edge sticking up above the front folded piece.


 Iron this piece so it holds it's shape.


 Now take the front and the back of the tie and sew it together across the top.


 Pinch the tie and use a needle to gather the top.


Open your ironed fake tie piece and sew the gathered top to the inside bottom layer only so that you can't see any stitching from the front.


 What it looks like folded back up:


Now take your needle and thread it through both pieces. After I did mine I realized I needed to make mine tighter, I think I left mine too loose but you judge what looks like a realistic tie on a tie.


 And here it is done...


 Next attach the 2 neck straps. I just hand sewed this through the back layer of fabric only.


 Add the Velcro...


 And that is it!


 Easy to put on, easy to take off! You can find ties at any thrift store for really cheap, I got a couple of silly ones also, Loony Toons and a Christmas one, which my son is actually excited to wear!