On the first day of kindergarten my son rode his little bike and I pulled my 5 month old and 21 month old daughters in my bike trailer. Now as I take my son to 2nd grade, he rides a 2 sizes bigger bike, my 4 year old rides behind him (without training wheels) and my 3 year old rides in the bike trailer. I can't believe how fast they are growing up.
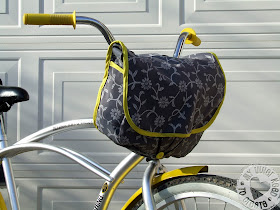
But in this last year I have found that my 3 year old likes to be in the bike seat, up off the ground and looking around, than in the trailer. This would be fine except we like to stay an hour at the park after school so I bring water, crocheting projects, snacks, etc. with me on our afternoon ride. It is easy to carry all this stuff in the big bike trailer but on my bike with the bike seat I couldn't carry a back pack, it hit my daughter right in the face, so I thought I would make myself a bag that could hook to the handle bars of my bike.
I got this Oliver & S Little Things to Sew book for my birthday. I love so many of the patterns in it especially the messenger bag. So I decided to use this pattern for my bike bag.
This bag required bias tape, lots of bias tape, so I thought I would try making some of my own. I used the yellow fabric left over from my daughters Halloween costume. It took allot of time to make and was really annoying, so I am going to use my next 50% off coupon from Jo Ann's to buy a bias making machine.
After I completed most of the bag but before I attached the back of the bag I sewed on the clips to attach it to my handlebar. This way to can sew it to the outside fabric but not the lining.
I choose these parachute buckles thinking they will be easy to snap on and off.
I folded a piece of gray fabric- 8 inches by 4 inches. Folding the 4 inches, raw edges into the inside, into a 1 inch by 8 each piece.
Insert 2 straps through both sides
Sew the 2 straps together at raw edges.
Measure strap placement by using the bike as your guide. Sew onto the back panel piece (not the lining).
I sewed it a couple times so I can carry heavier items without worry.
Finish the bag according to pattern and you're done!
Hope everyone's winter has been as warm as ours and you all can still get out and ride your bikes!


Brilliant idea! I'm just about to make a bag so I will definitely incorporate some handlebar clips.
ReplyDeleteThanks! It has been really useful! Be sure to sew the clips towards the top of the bag or it will flip over... I had to do mine twice!
DeleteJessica
Wow, that is fantastic, looks great on the bike.
ReplyDeleteThanks, I am really happy with the way it turned out!
DeleteThank you for your comment!
Jessica
What a fantastic idea!
ReplyDeleteDecent post. I recently stumbled upon your blog and wanted to express that I have really enjoyed reading your blog posts. Any way I'm going to be subscribing to your feed and I hope you post again soon.bicycle bags
ReplyDelete