Home

Sunday, February 19, 2012

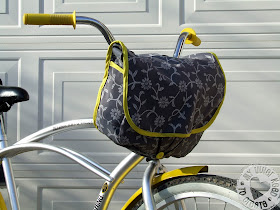
Messenger Bag into a Bike Bag


I am a bike rider, I actually ride my bike more than I drive my car. This is because I take my son to school and pick him up by bike everyday. It is a pretty good ride but we have been doing it, weather permitting, every school day for 3 years now.

On the first day of kindergarten my son rode his little bike and I pulled my 5 month old and 21 month old daughters in my bike trailer. Now as I take my son to 2nd grade, he rides a 2 sizes bigger bike, my 4 year old rides behind him (without training wheels) and my 3 year old rides in the bike trailer. I can't believe how fast they are growing up.
But in this last year I have found that my 3 year old likes to be in the bike seat, up off the ground and looking around, than in the trailer. This would be fine except we like to stay an hour at the park after school so I bring water, crocheting projects, snacks, etc. with me on our afternoon ride. It is easy to carry all this stuff in the big bike trailer but on my bike with the bike seat I couldn't carry a back pack, it hit my daughter right in the face, so I thought I would make myself a bag that could hook to the handle bars of my bike.

I got this Oliver & S Little Things to Sew book for my birthday. I love so many of the patterns in it especially the messenger bag. So I decided to use this pattern for my bike bag.


This bag required bias tape, lots of bias tape, so I thought I would try making some of my own. I used the yellow fabric left over from my daughters Halloween costume. It took allot of time to make and was really annoying, so I am going to use my next 50% off coupon from Jo Ann's to buy a bias making machine. 

After I completed most of the bag but before I attached the back of the bag I sewed on the clips to attach it to my handlebar. This way to can sew it to the outside fabric but not the lining.

I choose these parachute buckles thinking they will be easy to snap on and off.

I folded a piece of gray fabric- 8 inches by 4 inches. Folding the 4 inches, raw edges into the inside, into a 1 inch by 8 each piece.

Insert 2 straps through both sides

Sew the 2 straps together at raw edges.

Measure strap placement by using the bike as your guide. Sew onto the back panel piece (not the lining).

I sewed it a couple times so I can carry heavier items without worry.

Finish the bag according to pattern and you're done!


Hope everyone's winter has been as warm as ours and you all can still get out and ride your bikes!

Wednesday, February 15, 2012

Refashion a Girl's Dress from a Woman's Polo and a Baby Onesie!

Have a pile of clothes on it's way to Goodwill? Why not give a couple pieces new life and refashion them into something new and modern! I used an old white polo shirt and a blue striped baby onesie to make this dress:


Using the thick knit for the dress made it perfect and extremely comfortable and warm for winter (we live in Texas, so more like fall for the rest of the US!)


I think the blue stripes not only gives the dress visual interest but it looks kind-of nautical...


Want to see how I made it?

Here is what I started with:

Next I cut off the collar, sleeves and the bottom cuff.

Using one of my daughter's dresses as a pattern for the length and width I cut the white fabric to match.

Here is what the back looks like:


I used the back piece to cut the front piece.

Cut off the buttons and seaming on the front.

Here is what the front piece looks like.


I cut the onsie up the same way and avoiding the screen printed dog on the front.  I had to cut out 3 pieces because the onesie is so small and the length I needed was more than I thought.


The pieces have a width of 6 inches (folded in half in picture below) I sewed the 3 pieces together to get the correct lenght to go from the front of the yoke, around the neck and back down the other side of the front yoke.

I used the existing sleeves from the polo shirt, just cut off the seam and decreased the width to the sleeve width of your child. Laying the sleeve onto the cut front and back pieces I cut the top of the sleeves to follow the angle of the yoke, back of the neck and where the sleeves are going to be attached to the sides of the dress.

Sew the sleeves onto the dress first then sew from the end of the sleeve, all the way up and then down the sides of the dress- it just is easier this way.

Next attach the collar by sandwiching the dress in between the folded collar.
Have the child try on the dress and mark where the button should be, attach the button and a little elastic loop and you are done!


I also made these hair flowers with a book I got at the library: Kanzashi in Bloom by Diane Gilleland


I am going to enter this dress into the Sew-Vivor competition over at Family Ever After blog. Wish me luck!


Thursday, February 9, 2012

Valentine Shirt for Boys

V-Day is coming up, I used the Make It Love It Tutorial to make my daughters valentine's shirts, so now it was my son's turn. But what to put on a shirt for a 7 year old boy that wouldn't be too "girly". Here is what I came up with...


 I thought that a soccer ball would not only would make a more masculine heart but also I think he can wear this on other times, not just valentine's day.


Here is how I did it...

Draw out the soccer heart the size you want onto some scratch paper.


Trace the heart onto iron on fusible interfacing. Next cut out the black shapes and trace them reversed-- the right side facing down.
I numbered them so I would make sure to put them into the correct place but there wasn't many of them for this project like this on Soccer Applique T-Shirt, so you could probably skip that step.


Iron the paper onto black and white felt.
Cut out the shapes.


I used the paper I cut out the shapes from to line up the black shapes onto the white heart.


Carefully remove the paper and here is what you are left with.


Zig-zag stitch the lines between the black shapes first (I like to do around the shapes last so that all the beginnings and ends of the lines are hidden underneath the stitch around the black shapes).


Then stitch around all the black shapes.


Peal off the paper from the back of the white felt and iron onto the t-shirt.


 Zig-zag stitch around the heart and you are done!


A valentine shirt for a 7 (almost 8) year old 2nd grade boy...


That's how I did it...