Sunday, May 27, 2012

A Dress for Me and a Realization....

Simplicity Pattern 2444
So I have been making so many kids clothes these last couple months, I thought I would make myself a dress that I could wear to church at the family reunion in South Dakota next month.

Simplicity Pattern 2444
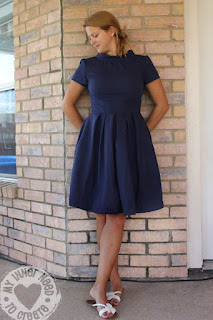
I went with Simplicity Pattern 2444. I choose the short sleeve variation with the cool 1950's stand up collar.


The pattern is fantastic and I will be certainly using it again. It is really simple with no lining or millions of pieces and it went together fast and easy. I even finished it in one night.

I will say that the pattern runs really small, I mean really small. I looked at the measurements before starting the dress and thank God, because I usually just go with the size I normally wear and then adjust from there. But I had to make this dress 2 sizes bigger than what I normally wear and it fits perfectly.

Simplicity Pattern 2444

I think that the stand up collar is really cute and adds some interest to an otherwise plain dress/design.

Simplicity Pattern 2444

And this is when I realized something... how different my taste in clothing is for myself and for my kids. I mean look at this dress. This is what I always wear, solid colors in simple traditional clothing.

Simplicity Pattern 2444

But for my kids, esp my girls, I love to think of every piece as a work of art. How I can make them stand out... while I make my clothes to blend in. I mean really, I have 3 navy blue dresses now that I have made myself in this last 2 years!
Simplicity Pattern 2444

So I am going to try and be more adventurous in my clothing... maybe not applique superheros on to my dress or a huge rainbow butterfly on my skirt but I am going to at least try some patterned fabrics and some different color combinations!

So watch out skirt week, my next project is to make myself a stand out skirt!!

Sunday, May 20, 2012

Skirt Week: Rainbow Butterfly Skirt


I had such a great time participating in Project Run & Play Sew Along this year I thought I would search out some more competitions to enter into... So here is my entry into Skirt Week 2012! It is a competition over at Crafterhours.


I choose to applique an oversize rainbow butterfly on a simple knit skirt with an elastic waistband.


Want to know how I made it? Well you will have to wait... I have been asked to post a tutorial over at Project Run & Play!!! It will be my first guest post and I am so excited!


But not only did this invite come when I am hosting a baby shower for my sister, have 4 orders of Piggie & Gerald dolls waiting on me, got my wisdom teeth out last week, but I am also going out of town for a family reunion for 2 weeks! So I thought I would kill two birds with one stone and use my entry into skirt week as the project to do my guest tutorial on.

So if you want a really detailed tutorial on how to applique a butterfly on to a skirt check out the Project Run & Play blog on June 28th!


Ok... off to make baby shower favors for my little sister's shower!

I

Thursday, May 17, 2012

Subway Art Dresses


So this week is the final week for Project Run & Play, I am participating in the Sew Along group. This week's theme is "Signature Look". So here is mine!
I based the idea off of Subway Art that I have been seeing all over the Internet this last year. 


Not familiar with Subway Art? Here are some of my favorites: Lil Blue Boo did hers for New Year Resolutions and I Am Momma Hear Me Roar did hers on a huge piece of plywood for under $7! (I am going to be making one of these next for this very empty space on my stair well).  I thought that this would be a cool concept to use on apparel so I thought I would applique the words on to dresses for my girls.


I took look at the clothing I have created for my kids this last year I decided that my Signature Look would be that I like to add an element of flare, something to stand out, something artistic, and place it on a simple, basic well designed, dress, shirt, skirt, etc.


For my littlest, Julia's dress I used Simplicity Pattern 1949. The same pattern I used for my Hand painted Earth Day dress.  (It is my new favorite pattern!) This time I did the one with short sleeves and rounded neckline. I paired it with just an a-line skirt for the bottom so that the words are more readable. 


For my elder daughter, Jaden's dress I made up the pattern. I really like the way it turned out and how well it fits I wish I would of made a more detailed pattern that I could use again. I wanted it to have a kimono like feel with a high waist and again a simple a-line skirt, which I feel I accomplished.


Now for the words...
I choose to do phrases about each one of my girls, little saying that I thought pertanded to them, nicknames I use for them, etc. So these dresses are as original as they are!

First I designed out the words on Adobe Illustrator- size, kerning, etc.
Then fit all the words on to the 12"by 12" mat in my Sure Cuts Alot program for my cricut.
Then after watching a nice video on youTube I figured out how to cut fabric with my cricut & it worked!! All you have to do is set the blade on 4, slowest speed, and highest pressure.
You iron the interfacing on to a piece of 12" by12" fabric, pull off the paper and stick taht side, the glossy side on to the cricut mat.

And it worked! I have had some problems with getting my cricut to do want I want it to do. But this worked great and so after I pulled all the little letters off the mat I arranged them on to each skirt, leaving room for the hem on the side, top and bottom.


I little chalk helped me keep everything straight. Then I ironed everything down. The most time consuing part was to zig-zag stitching around the letters. But atually it wasn't too bad since for the little letters I just zig-zaged around the entire letter instead of outlining them.


After I finished the dresses I added a pop of color, I chose lime green.


I used a damask ribbon and made a pleated belt on one of the dresses and a ribbon belt and pleated ruffle on the bottom of the other.


So there it is my signature look!


Two special little dresses for my special little girls.


I made their little white legging from old t-shirts last year in this post: Refashioning Is New To Me!


Project Run & Play has been so fun for me this year. I have grown so much in my sewing skills as well as in my designs. I stuggled to meet the deadlines, come up with ideas and even had to relize that some ideas just don't come out as you thought! Being in a contest has really challanged me and I loved every minute of it. So I am off to make a couple skirts for Skirt Week over at Crafterhours blog!!!
Have a great weekend!

Thursday, May 10, 2012

Girl on Fire! Hunger Games Inspired Dress


Well, it is now Week 5 of Project Run & Play. I am participating in the Sew Along Challenge, this weeks' theme was Movie Inspired. So here is my dress inspired by The Hunger Games. 


When I first read the theme for this week I immediately wanted to make a dress that was on fire! I had read the books before the movie came out and had fallen in love with the idea of a dress that looked like it was on fire. I had some trouble with this dress, my first plan didn't work out so great so after many late nights I arrived at something else entirely..


I started with the bodice from Simplicity Pattern 2644


I used the dress variation with the darted bodice and the slitted short sleeves. This was a pretty simple pattern except for the dart in the center of the bodice. The diagram was really confusing on what they wanted you to do with tacking and where the gathers were suppose to be placed. I think I did it right....


For the dress bottom I used one of my daughters A-line dresses as a pattern (my last week's entry for the Project Run & Play Sew Along).


I added gathered tulle onto the skirt to make the fire. I had gold, orange and red but to make it appear more gradual and more like fire I mixed and matched the colors.


Next I headed back over to Dana from MADE's tutorial on measuring out a circle skirt and making the skirt only 4 inches long I created the top ruffle.


I attached it to the skirt before attaching the whole thing to the bodice. The pattern called for buttons at the back but I just went with a basic zipper.