Flickr Friends: Jessica from My Inner Need to Create
Hi y'all! I am Jessica and I blog over at My Inner Need to Create. I am a stay-at-home mother to 3 kids (8, 4 and 3) but once a upon a time I was a web and graphic designer. Though I am not doing this as my career right now, I see this side of my style bleed through into all my crafting. In fact I like to think of all the clothes I make as a canvas waiting for me to make it into a piece of art. I like to do this in many ways but love the look of appliqueing...
Here is a recent appliquéd project: Rainbow Butterfly Skirt.
To start I took a skirt of my daughter's to use as a pattern. I chose a thick gray knit as the fabric for the skirt (it was left over from my Superhero Circle Dress from Week 1 of the Sew Along). I just made a simple A-line skirt with no seem allowance for the top since I planned on using 1.5 inch elastic for the exposed waistband.
Take your design and trace it on to Iron-On Fusible Interfacing, make sure that you reverse the image!
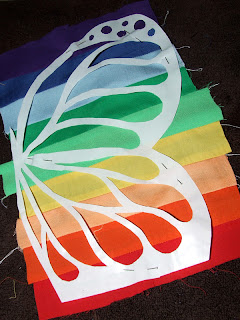
After the strips are sewed together and ironed flat, use the paper backing off of the Iron-On Fusible Interfacing as a template and cut out the wings.
Here is a recent appliquéd project: Rainbow Butterfly Skirt.
After the front and back of the skirt was cut out, I sewed one of the side seems together and laid out the skirt flat. Next I drew out the butterfly design, I used the skirt shape to dictate the cropping on the butterfly.
Iron the butterfly onto the black fabric.
Next- cut it out.
Peel off the paper from the back of the butterfly, you will need this for a template in a minute.
For my butterfly I wanted a rainbow, but at this step you could use a cute print or a solid color. I choose my colors and sewed them together in 1.5 inch strips.
Iron the black part of the butterfly onto the colors. Take another piece of interfacing and iron it onto the back of the entire butterfly. Then iron that piece onto the skirt.
Next you have to zigzag around all the black raw edges. I sewed with black thread...
but with a gray bobbin thread so that I didn't have to line the skirt.
I sewed the skirt together at the other side then I attached the 1.5 inch black eleastic as the waistband.
The skirt turned out very eye-catching with the bold, big butterfly but it is a really simple jersey knit skirt with very limited sewing skill needed (the zigzagging around the pieces of the appliqué takes the most practice.)
My daughter loves the skirt and wears it everytime she finds it in her drawer clean.
I took these photos with her wearing a black leotard as her top but a 3 year old wearing a leotard all day is really not ideal for going to the bathroom. So I refashioned a slimming black tank top from an old (very old!) tube top if you hop over to my blog you can check out the tutorial!
Thanks for inviting me to guest post during this month of Flicker Friends! I am so glad to be able to get in on the fun! I hope everyone is having a great summer!


Omg, this is truly Amazing! :)
ReplyDeleteThank you for posting this! I would love to make this skirt for my 4-year-old granddaughter! The butterfly is beautiful--but I'm not artistically inclined--so I know there is no way I could draw that on my own! Can you please tell me where you found the butterfly? I haven't found any links to a pattern for it on your tutorial here--or on Project Run and Play. :(
ReplyDeleteThank you in advance! :)
Lisa Peden
http://LisasStitchingPost.com
Thanks for the multicolored applique tutorial! I've pinned it to my "Quilty Goodness" board on Pinterest (with proper credit, of course!). Feel free to follow me if you'd like: http://pinterest.com/lipglass/quilty-goodness/
ReplyDelete