Showing posts with label Boy Sewing. Show all posts

Friday, November 8, 2013

Tween Sewing for Boys

Re-Posting a guest post onto my site:

Hi, I'm Jessica from My Inner Need to Create, I have three kids, ages 4, 5 and 9. And to be perfectly honest when I got the email from Sally inviting be to contribute to this site I said (out loud) "WHAT, I'm to young to be a mother of a Tween!" Oh, where has the time gone!!
Well, unlike the previous guest bloggers, I haven't had many fit issues with my Tween, he seems to be a pretty standard size, with him it is more of a style issue. Almost all of my last years' sewing projects for him have sat in the closet, untouched.
So I approached this project differently. I knew what I wanted to make him, a military cargo jacket. So instead of starting this project on my own, I included my son. I showed him pinned jackets, let him choose a style, gave him a choice of the fabric, etc.

Then I got to work...
There are A LOT of pieces to this pattern but I promise it isn't that complicated.

 
PATTERN
These aren't to scale but the measurements are on them if you want to try out making this jacket for your tween. This is size 10 and you will need to add seam allowances.


STEP BY STEP
1.       Sew back top and back bottom pieces together, of both the fabric and the lining. Top stitch the seams flat. Sew the left and right side of the back together to make one piece. (Do this for both the fabric and the lining).

2.       Assemble the hood, both fabric and lining. Then attach the 2 with right sides together, flip and top stitch around.
3.       Stitch pleat into all 4 pockets. Fold under all raw edges and baste. On top of the pockets roll completely to hide exposed raw edge, stitch across.
4.       For the pocket flaps I made the buttons invisible by making 2 flaps each for each pocket.
Roll under and stitch one of the long sides of each of the pocket flaps (8 total).
Sew two button holes into one of each of these pocket flaps (4 total).  
Then put two flaps together (one with button holes and one without), wrong side, right side and stitch around the other 2 sides of the flap. Flip and top stitch the two short sides.
5.       Attach the pockets to the front pieces of the jacket.

6.       Sew the front pieces to the back piece at the side and shoulder seams. Do the same for the lining.

7.       Hold sleeves in half and stitch up the side. Attach sleeve from fabric to the jacket from fabric and the sleeve from lining to the jacket from the lining fabric.

8.       Fold collar in half. Sew the hood, collar and lining to the jacket. You might need to baste first depending on your fabric choices. Flip.
9.       With a separating zipper attach zipper to the left side of the jacket by putting it between the lining and the fabric of the jacket.

10.   Sew the second half of the zipper to the other side of the jacket, lining only. Then hold the front button panel in half and sew that piece to the fabric of the jacket, from the top of the collar all the way down to the bottom of the jacket.  Then sandwiching the zipper between the fabric and the lining sew the zipper into the jacket.
11.   Roll under the lining and the fabric of the sleeves and sew around to create a cuff.

12.   Roll under the bottom of jacket and sew around.

13.   Sew button holes into the button panel on the front and sew all 14 buttons onto the coat.
DONE!
 
He seems to like the jacket so I am hoping he wears it.... I will have to wait and see though, since I live in Texas and it was 105 degrees today!


Thanks for inviting me to contribute to this blog! It is a great idea and with 2 more kids closing in on tween status I am sure it is to become a very important resource for me!
Have a great week!
~Jessica

Wednesday, September 4, 2013

Sew Cool for the Tween Scene

So the two amazing ladies from Without Directions and Daisy Chain Creations have some together to create a new blog: Sew Cool for the Tween Scene.

A BlogSpot to spotlight a missing link in the pattern industry: Tweens. They are not physically ready or mature enough for adult clothes, and thus adult patterns; both in the big name patterns and Indie patterns that we love.  Even when there are sizes that fit our girls, they are not designed with a pre-teen in mind.  So these ladies will act as curators for pre-teen patterns and pre-teen sewing ideas!


And as a kick off party they lined up some guest's to post.... And I am one of the chosen few so head on over there to check out the Military Cargo Jacket I made for my Tween.
~Jessica

Monday, January 21, 2013

Adventure Time Wallet

Adventure Time Finn Wallet
 
So if you have looked around my blog you already know that my son loves Adventure Time (Birthday, Shoes, crocheted figures and Shirt ).  So it was an easy decision on what to put on a wallet I was making him, Finn.
 
Adventure Time Finn Wallet
 
You will need:
7 inch zipper
9.5 by 5.25 interfacing
9.5 by 5.25 white felt
9.25 by 5.25 white cotton
 
3.5 interfacing
2 pieces of 3.5 by 5.25 white cotton
 
5 inch piece of white Velcro
 
oval piece of flesh colored felt, iron on interfacing ironed on the back 
 
 
Adventure Time Finn Wallet
 
Iron and sew the face on first- on to the felt, between 2.5 inches from the top and 3.5 inches up from the bottom. Then sew the felt to the long piece of cotton, right sides together, leave an opening so you can flip. Also sew the two smalled pieces of white cotton together.
 
Adventure Time Finn Wallet
 
Ok- now this is where I discovered my mistake. I was making this wallet for my son to store his "Monkey Money" from the orthodontist in. "Monkey Money" aren't small coins, the are large wooden coins and the coin section I was making was only going to be 3.5 inches high and couldn't store the already 10 coins he had, not to mention any more he was going to get.
 
Adventure Time Finn Wallet
 
So if you are making a small pocket and zippered pouch, continue on with the small piece of white cotton fabric. Sew one side of the zipper to the side with the face and sew the other side of the zipper to the small cotton piece. Next sew a piece of white Velcro onto the bottom of the felt piece with the face.
 
Adventure Time Finn Wallet
 
So here it is with the bigger piece. Still sew the pieces together with the zipper in between. 
 
Adventure Time Finn Wallet
 
Fold the cotton piece over. Sew up the two sides and cut the zipper.
Also sew the other piece of Velcro onto the top of the longer piece.
When sewing with the smaller piece leave the top unsewn so you can put bills or ID cards in the unzippered pocket this created.
 
Adventure Time Finn Wallet
 
And you are done! Mine has a pocket big enough for all those wooden coins.
 
Adventure Time Finn Wallet
 
But is still small enough to fit in his pocket.
 
Adventure Time Finn Wallet
 
And has a cute little Finn face!
 
~Jessica
Small Things

Thursday, October 4, 2012

Boy's Week

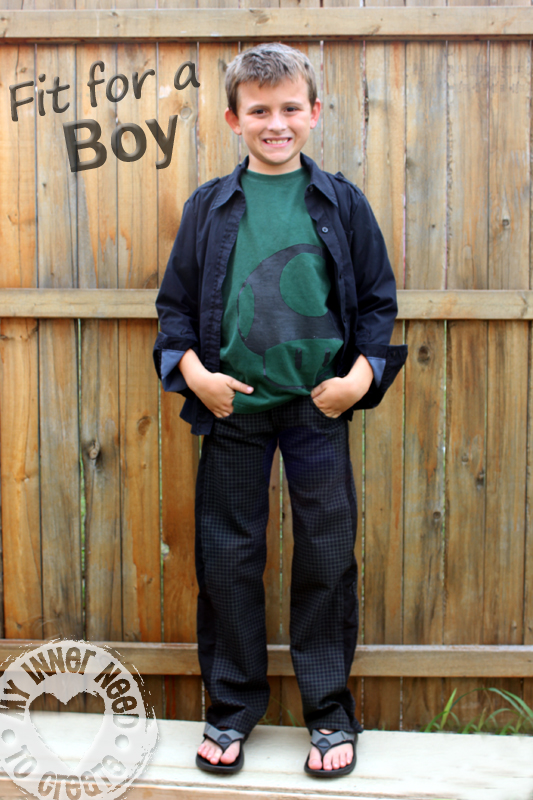
Mario Mushroom Shirt with Straight Leg Plaid Pants
 
This week's sew along challenge for Project Run & Play was creating an outfit for a boy. I love making stuff for my son, but as he gets older I have to check and recheck that I am not doing something that will cause the outfit/bag/etc to be unused and labeled uncool.
So my challenge this week so to create an outfit for my 8 year old son....

Mario Mushroom Shirt with Straight Leg Plaid Pants
 
I used the Peek-A-Boo Pattern Shop's pattern for skinny jeans, thinking they are cool now right? Well, he is 8 but I made a size 10 so that they would be not so skin tight and I a giggling now thinking of his look when I had him try them on =) They were SO tight, an 8 would of never even been pulled on!

Mario Mushroom Shirt with Straight Leg Plaid Pants
 
 
So my fix? I added a tuxedo strip down the side. They increased each of the legs 1.5" and the but/crotch area 3". Now they look more like straight leg pants instead but I got the thumbs up from him and he was able to sit down without busting a seam.

Mario Mushroom Shirt with Straight Leg Plaid Pants
 
I freezer paper stenciled an understated, over sized Mushroom from Mario onto his shirt.
 
Mario Mushroom Shirt with Straight Leg Plaid Pants
 
His jacket I made by refashioning an old shirt of mine. The hardest part was making the shirts darts into less of a woman's shape and more boxy like a cargo jacket. I fully lined the shirt and added pockets and button flaps onto the shoulders.

Mario Mushroom Shirt with Straight Leg Plaid Pants
 
I wanted to paint or applique something onto the back of the jacket, but like the yellow shirt, my idea was shot down.

Mario Mushroom Shirt with Straight Leg Plaid Pants

Mario Mushroom Shirt with Straight Leg Plaid Pants

Mario Mushroom Shirt with Straight Leg Plaid Pants
 
Check out other Sew-Along participates at the Flickr site.
Have a great day!
~Jessica

Wednesday, August 1, 2012

Detailed Freezer Paper Stenciling


So I, and I know you have also, seen a million freezer paper t-shirts/designs. I have only used the technique on some fabric favor bags for my sons' birthday party. But I got this really great idea to make t-shirts for my family to wear to the hospital to welcome my sister's baby  (she had the baby by the way, a boy, Liam a couple days ago) and so I wanted to practice with the paper and see just how detailed the technique would allow me to go.

So I used a couple dollar store tee shirts and got to cutting...


The robot turned out the best, I think because the silver paint was thicker... or maybe because it was the 3rd shirt I had done and I was just better at it?


In case you didn't know, here's how I did it:
Draw out, or print out, the image you want on the shirt in the size you want. Black out the areas that you are cutting out (they will be the parts that will be painted) so these black areas on the mermaid princess will actually be white from the paint.


Trace it on to the freezer paper, not the waxy side.


Cut out the areas that you are going to paint. I tried to leave most of the image connected so I didn't have a lot of little pieces floating around but I did have a few in the hair.


I decided not to cut out any pieces from her face and just drew them in with a small paint brush after I pulled off all the paper.


Next, iron. I think it worked the best with a really hot dry iron. Do not pull it up to reposition, this is a one shot thing. The wax will melt a little into the fabric and hold it in place but once removed it won't work again.


A couple of my edges didn't stick well but when I was sponging on the paint I just made sure to sponge only on top of the paper to lay it down and the paint held it there pretty good.


I sponged on 3 layers of the white paint since I was painting a light color onto a darker shirt. For the robot shirt I only did 2 layers.


After the shrits are dry, pull the paper away and you are done!


The kids are happy with the way they turned out.... mostly because they were what they asked for.


Julia loves mermaids and princesses, in fact she wants to be a mermaid when she grows up.


Jaden thinks she is already a princess, so I made hers a fairy tale princess.


 I really like my son's, it really makes a plain shirt special.


 I also really like the silver paint, need to come up with an idea for a shirt for me =)


The technique worked out really good for small detailed designs, so I did end up using it for the shirts I made for my family... that is my next post!