Showing posts with label embroidery. Show all posts

Friday, June 22, 2012

A Pirate Messenger Bag with Shark Applique

Pirate Messenger Bag with Applique Shark

What is a little boy suppose to carry to hold all his treasures?
A Pirate Messenger Bag!
I thought since I made the Marker Travel Bags for my girls that it was my son's turn for a project.

Pirate Messenger Bag with Applique Shark

 He often has legos, books or some spinning top game called Bey Blades that he wants to bring along to his aunt's house or when we are running arrends. So when I was browsing Walmart's fabric department and found this great pirate print on the clearance rack I knew what I wanted to do.


I turned to my trusty book: Little Things to Sew book by Oliver + S. I have made the messenger bag pattern before to make this Bike Bag. This time I made the smaller version of the bag.

Pirate Messenger Bag with Applique Shark

The pattern is fabulous and came together so quickly (espically since this isn't the first time using this pattern). I can't find the shoulder strap hardware anywhere, so I tried this silver double loop belt buckle and it worked fabulously.
Because my son is 8 years old, I didn't want to make the bag too little boy-ish so I lined the bag with the pirate fabric and used a black duck fabric for the exterior of the bag. The green bias tape I made from the left over fabric I had from his superhero halloween costume.

Pirate Messenger Bag with Applique Shark

I embroidered his name on the back.


Pirate Messenger Bag with Applique Shark


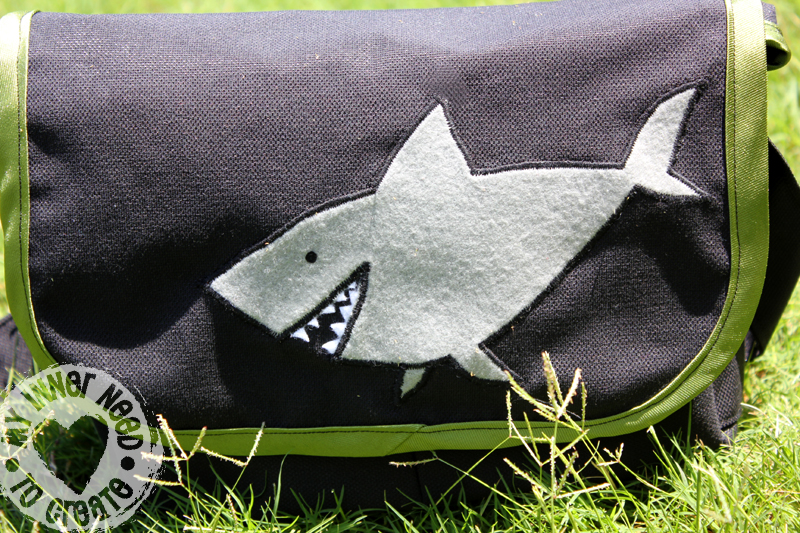
And appliqued a shark on the front of the bag (his choice, I wanted the cute pirate or the red sea dragon).

Pirate Messenger Bag with Applique Shark

He loves the bag and will get a lot of use out of it- and that is all that really matters.


Pirate Messenger Bag with Applique Shark
Places I am linking: Pink Hippo Party


Thursday, September 29, 2011

Soccer Bag in 3-D!


This is my daughter's first year to play soccer, she is 3 (will be 4 next month). She loves it! So I thought I would make her a bag to carry her ball and water to practice. And a bag that will store her cleats and shin guards when not playing soccer. So I got to work designing my next soccer bag, here is the one I made for my son awhile ago: Soccer Bag
So as I drew out what I wanted to make I realized 2 things, she is small but the things she needs to carry aren't. Meaning I wanted to make her a small drawstring backpack- but it needed to be big enough to fit a ball so my idea of a 3-D applique was born...


 I think the size fits her perfectly...


And she seems to like it! 


So you want to know how to make one? First I took the ball as traced the 2 basic shapes onto paper. Next cut out all the shapes (don't forget to add a seam allowance!) that you need to make 1/2 a ball. 


Sew all the pieces together.


Next I cut a white fabric to be my inside lining and laid that and the ball fabric onto a real ball. I folded under the raw edges of the ball and folded the lining fabric up to create a clean edge.


Sew on to the fabric of the bag.


Make sure it holds the 3-D shape of the ball.


Flip it over and carefully cut out the bag fabric and not the ball fabric or the lining. Now is the time to embroider a name on the bag if you are going to do so.


Since my bag fabric wasn't as thick as I would of liked and I had some $1 fabric with soccer bags in my fabric stash in my closet I decided to line my bag. I pinned the lining to the inside of the bag and cut the opening to match the black bag opening.


Then I folded the black bag fabric up and under the soccer ball lining fabric which I folded under making the seam nice and pretty.


Fold down the top and sew leaving the space to pull the cord through for the drawstring. If you need help on how to make the drawstring bag with 2 pulls from each side you can see it here: Texas Drawstring Bag
Remember if you want to make this into a backpack you will need to sew loops into the bag at either side to hold the two ends of the drawstrings.


And there you have it! The ball fits perfectly into it's place with plenty of room for a water bottle!


A bag any soccer player would love!


I decided to enter my project into the American Crafter contest over at Naptime Crafters!! Cross your fingers for me!


I also linked it here:

Whimsy Couture


Saturday, May 7, 2011

Personalized Gifts

This last week was teacher appreciation week so to show my son's teacher how much we appreciate her I personalized a tote bag for her. I appliqued the apple using felt and we attached a card with a note from my son with a raffia ribbon and it looked perfect.


But I didn't stop there I decided to try out the embroidery art that came on my sewing machine (not just the fonts).

~Jessica

Wednesday, May 4, 2011

Visors for Everyone!!


So I found these visors at the Dollartree this week and saw, yes, cute hats for my kids to wear this summer, but also another chance to use my embroidery machine!
So they started out as this:
And ended up as this:

So after getting 3 for my kids I decided to do a couple more for some friends and cousins.

I think they turned out to be great gifts considering they were only $1 each- and the group photo opportunities are going to make them worth every penny!