Showing posts with label Upcycling. Show all posts

Thursday, October 4, 2012

Boy's Week

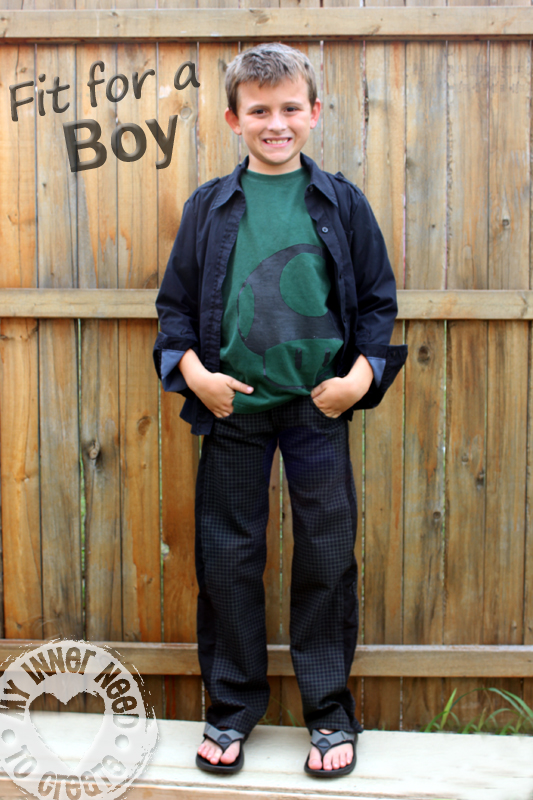
Mario Mushroom Shirt with Straight Leg Plaid Pants
 
This week's sew along challenge for Project Run & Play was creating an outfit for a boy. I love making stuff for my son, but as he gets older I have to check and recheck that I am not doing something that will cause the outfit/bag/etc to be unused and labeled uncool.
So my challenge this week so to create an outfit for my 8 year old son....

Mario Mushroom Shirt with Straight Leg Plaid Pants
 
I used the Peek-A-Boo Pattern Shop's pattern for skinny jeans, thinking they are cool now right? Well, he is 8 but I made a size 10 so that they would be not so skin tight and I a giggling now thinking of his look when I had him try them on =) They were SO tight, an 8 would of never even been pulled on!

Mario Mushroom Shirt with Straight Leg Plaid Pants
 
 
So my fix? I added a tuxedo strip down the side. They increased each of the legs 1.5" and the but/crotch area 3". Now they look more like straight leg pants instead but I got the thumbs up from him and he was able to sit down without busting a seam.

Mario Mushroom Shirt with Straight Leg Plaid Pants
 
I freezer paper stenciled an understated, over sized Mushroom from Mario onto his shirt.
 
Mario Mushroom Shirt with Straight Leg Plaid Pants
 
His jacket I made by refashioning an old shirt of mine. The hardest part was making the shirts darts into less of a woman's shape and more boxy like a cargo jacket. I fully lined the shirt and added pockets and button flaps onto the shoulders.

Mario Mushroom Shirt with Straight Leg Plaid Pants
 
I wanted to paint or applique something onto the back of the jacket, but like the yellow shirt, my idea was shot down.

Mario Mushroom Shirt with Straight Leg Plaid Pants

Mario Mushroom Shirt with Straight Leg Plaid Pants

Mario Mushroom Shirt with Straight Leg Plaid Pants
 
Check out other Sew-Along participates at the Flickr site.
Have a great day!
~Jessica

Thursday, September 27, 2012

White Trench Coat with Silver Painted Doodles


Girls White Trench Coat with Painted Design
 
Girls White Trench Coat with Painted Design
 
This week's theme for Project Run & Play is the White Sheet challenge. Luckily I had this thick, beautiful, expensive white sheet that my sister had given me when she took her full bed out of the nursery.
 
Girls White Trench Coat with Painted Design
 
I decided to make a trench coat of sorts. Something with a modern twist, making it white.
 

Girls White Trench Coat with Painted Design
 
The entire jacket is lined and the zipper is hidden. This was a very exciting project for me. Not only did I make up the whole pattern but I had to figure out what needed to be done first, next etc.

Girls White Trench Coat with Painted Design
 
Girls White Trench Coat with Painted Design
 
I hand drew some doodles/stars and painted them with silver fabric paint.

Girls White Trench Coat with Painted Design
 
Added a Mandarin collar and a silver button.

Girls White Trench Coat with Painted Design

Girls White Trench Coat with Painted Design
 
I have about a million things on my to-do list today so I have to get moving. Check out the Flickr group to see what every one else did with their white sheets!
~Jessica


Sunday, June 24, 2012

Refashioned Tank Top from a Tube Top

So this was the easiest refashion EVER, but it has turned into one of my favorite tops for my daughter. I think it is the fit that makes me love it so much.

I made this top to go with this appliquéd Rainbow Butterfly Skirt because none of her other shirts look right with it. They were either too loose and distracted from the skirt or too long so it needed to be tucked in, which didn't look right either. So I knew exactly what I wanted before I started this project...

I started with a really (and I mean REALLY) old tube top of mine.

I used one of her shirts as a pattern for the tank top, cutting the arm hole angles the same as the sleeveless top I was copying.

But I wanted the tank top to be very form fitting to her body so I cut the pieces straight down instead of A-line like most of her shirts are.


Sew the front and back pieces together at the side seams. The half moon shapes that you are left with will be your sleeves. 
Sew a small seam on the raw edge of the arm pit holes. Then sew a small seam on the raw edge of each of the sleeves then attach them to the front and back of the top. And you are done!

The top was so easy to make mostly because I used the bottom existing hem and the top existing hem. But I really like this style on my daughter's body type so I am going to make a couple more from regular fabric using this top as a pattern.


Hope you all are having a great summer so far!


Friday, June 8, 2012

My Son's First Sewing Project: Sock Monkeys


A couple weeks ago I ran across this tutorial on CraftPassion to make sock monkeys. I thought they were SO CUTE! And when I ran into the 99 cent store and found the cutest colored socks I knew I had to make a couple. I also thought that I would get the kids involved in this project to kill an afternoon...


I did a couple things "wrong" from the tutorial- 1. I didn't read before I started cutting and you are suppose to sew first then cut! That would have helped my son out since it was his first time to use the sewing machine but for me it was no problem.


2. I bought the knee high socks thinking I would cut them off to make the legs and arms shorted but then decided to leave them long. I think they look a little funny with such long limbs but the kids love them like this. They are able to tie them anywhere, around the bunk bed rafters, ceiling fan, their necks, each other....


My son is 8 and I thought I would let him try his hand at sewing.


He did pretty good!


I had the girls help stuff the arms and legs.


Now they walk around claiming they made theirs also...


Jace's least favorite part was the stuffing, mine too since all 3 of the kids quit and left me to finish!!


Here is his finished monkey... a few mistakes, but they give the monkey character =)


There was some hand stitching involved as well as sewing on buttons. I think these good skills that as a grown man will serve him well (I hope my son will be able to hem his pants or fix a button on his dress shirt with out going to a tailor when he is older).


I embroidered their names onto the bottoms of the animals, as well as the date for Jace's to remember when he made it.


The monkeys are being well loved: they are being dragged around the house, swung around by their tails, and being tied to just about everything.


All in all, fun summer project! 

Thursday, April 26, 2012

Handpainted Upcycled Earth Day Dress...


On to week 3 of Project Run and Play Sew Along, this week's theme is Earth Day. The challenge was to upcycle an old piece of clothing into something new. Here is my interpretation:


I started with an old cargo skirt that was in my goodwill box.


 It was the perfect color for an earth day dress and it had a lot of fabric so I was able to use a new pattern I had been itching to try, Simplicity 1949.


I made the sleeveless dress version. Then revised the pattern to add a ruffle onto the sleeves. I wanted the ruffle to go longer than the arm sleeve hole so this was my solution:


I drew with chalk the outline of the tree before going in and painting it with fabric paint.


I did the same thing with the little girl silhouette on the back of the dress.


I am in love with this pattern and dress! It came out so cute and has a flattering fit.


I think the free hand painting adds real interest to the dress.


 Hope y'all are having a good week!