

Thursday, June 28, 2012
Guest Posting at Project Run & Play
I have my first guest post today over at Project Run & Play! So hop on over there and learn how to make a Rainbow Butterfly Skirt!

Sunday, June 24, 2012
Refashioned Tank Top from a Tube Top


I started with a really (and I mean REALLY) old tube top of mine.

I used one of her shirts as a pattern for the tank top, cutting the arm hole angles the same as the sleeveless top I was copying.


Sew the front and back pieces together at the side seams. The half moon shapes that you are left with will be your sleeves.

Sew a small seam on the raw edge of the arm pit holes. Then sew a small seam on the raw edge of each of the sleeves then attach them to the front and back of the top. And you are done!

The top was so easy to make mostly because I used the bottom existing hem and the top existing hem. But I really like this style on my daughter's body type so I am going to make a couple more from regular fabric using this top as a pattern.


Hope you all are having a great summer so far!

Friday, June 22, 2012
A Pirate Messenger Bag with Shark Applique

What is a little boy suppose to carry to hold all his treasures?
A Pirate Messenger Bag!
I thought since I made the Marker Travel Bags for my girls that it was my son's turn for a project.

He often has legos, books or some spinning top game called Bey Blades that he wants to bring along to his aunt's house or when we are running arrends. So when I was browsing Walmart's fabric department and found this great pirate print on the clearance rack I knew what I wanted to do.

I turned to my trusty book: Little Things to Sew book by Oliver + S. I have made the messenger bag pattern before to make this Bike Bag. This time I made the smaller version of the bag.

The pattern is fabulous and came together so quickly (espically since this isn't the first time using this pattern). I can't find the shoulder strap hardware anywhere, so I tried this silver double loop belt buckle and it worked fabulously.
Because my son is 8 years old, I didn't want to make the bag too little boy-ish so I lined the bag with the pirate fabric and used a black duck fabric for the exterior of the bag. The green bias tape I made from the left over fabric I had from his superhero halloween costume.
Because my son is 8 years old, I didn't want to make the bag too little boy-ish so I lined the bag with the pirate fabric and used a black duck fabric for the exterior of the bag. The green bias tape I made from the left over fabric I had from his superhero halloween costume.

I embroidered his name on the back.
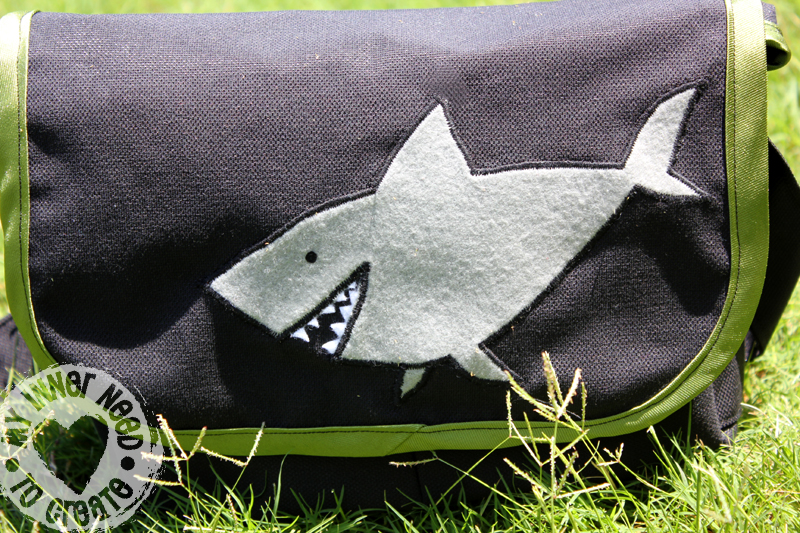
And appliqued a shark on the front of the bag (his choice, I wanted the cute pirate or the red sea dragon).

He loves the bag and will get a lot of use out of it- and that is all that really matters.


Monday, June 11, 2012
Appliqued Bunny & Monkey Marker Bags

So, I finally completed one item on my Future Projects List, marker travel bags for the girls. I put this on my to-do list back at Christmas after making my nephew, Ethan, one. The girls love to draw/color and we often find ourselves in places that are "boring." So I thought that these would deter the boredom for a little bit.


Here's how I made them:
I started with these pieces:
2 main bag pieces: 20" X 9.5"
1 inside marker pocket: 5" X 16"
Small inside tablet pocket 1: 4.5" X 9.5"
Large inside tablet pocket 2: 7" X 9.5"
I made an outside pocket for some twist up crayons I found at the store, but the pocket can be sized to fit regular crayons.
Front pocket: 5" X 9"
Front pocket flap: 4" X 8"
For each one of these pieces (except the main bag pieces) I created a bias tape edge across the top.

Next just layout all your pieces and pin.

Actually put the markers into the bag and pin around them, this way no math is involved. Do this for the crayon pocket on the outside of the bag also. The outside pocket flap I just rolled the raw edge under and sewed it to the bag.

After you stitch everything down it is time for the applique.


Iron the pieces down and zig-zag stitch around the applique..

I made 2.5 inch bias tape, which folds down to .75" to stitch around the entire bag (placing the outside and the inside of the bag together, wrong sides). Insert the handles into the bias tape at this time.


I also used a piece of bias tape to sew down the middle on the outside and inside of the bag. Next attach Velcro to the top and you are done!
Hope this will keep my little ones quiet on this 13 hour car trip I am going on in 2 days!
Friday, June 8, 2012
My Son's First Sewing Project: Sock Monkeys

A couple weeks ago I ran across this tutorial on CraftPassion to make sock monkeys. I thought they were SO CUTE! And when I ran into the 99 cent store and found the cutest colored socks I knew I had to make a couple. I also thought that I would get the kids involved in this project to kill an afternoon...

I did a couple things "wrong" from the tutorial- 1. I didn't read before I started cutting and you are suppose to sew first then cut! That would have helped my son out since it was his first time to use the sewing machine but for me it was no problem.

2. I bought the knee high socks thinking I would cut them off to make the legs and arms shorted but then decided to leave them long. I think they look a little funny with such long limbs but the kids love them like this. They are able to tie them anywhere, around the bunk bed rafters, ceiling fan, their necks, each other....

My son is 8 and I thought I would let him try his hand at sewing.

He did pretty good!

I had the girls help stuff the arms and legs.

Now they walk around claiming they made theirs also...

Jace's least favorite part was the stuffing, mine too since all 3 of the kids quit and left me to finish!!

Here is his finished monkey... a few mistakes, but they give the monkey character =)

There was some hand stitching involved as well as sewing on buttons. I think these good skills that as a grown man will serve him well (I hope my son will be able to hem his pants or fix a button on his dress shirt with out going to a tailor when he is older).

I embroidered their names onto the bottoms of the animals, as well as the date for Jace's to remember when he made it.


The monkeys are being well loved: they are being dragged around the house, swung around by their tails, and being tied to just about everything.

All in all, fun summer project!
Subscribe to:
Posts (Atom)