Thursday, December 22, 2011

Adventure Time Shoes

Adventure Time Shoes

My son LOVES this cartoon Adventure Time on the Cartoon Network. So I thought after making the Angry Bird shoes for my niece that I would make a pair of Adventure Time shoes for him for Christmas.

Adventure Time Shoes

I didn't realize how hard it was to find simple white canvas slip on shoes for boys but I finally gave up after the only ones I found were expensive and I would have to pay shipping also. I found these black OP ones at Walmart for only $10.
Adventure Time Shoes

I was planning on painting a whole setting for the characters on the shoe but since the shoes were black I decided to just do all the main characters with the background the shoe. I think it makes them stand out more and it certainly make the painting easier and faster.
Adventure Time Shoes

He hasn't opened them yet but these shoes are bound to be his favorite because
1. Finn and Jake
2. something to show off at school and
3. he won't have to tie his laces anymore!!
Adventure Time Shoes

If you want to know what paint/technique to make these check out the Angry Bird shoes I made.
Hope you all are having a good holiday season!
Adventure Time Shoes


Wednesday, December 21, 2011

Apple Ornament for Teachers- Made from a Book!

Apple Ornament made from a book

Apple Ornament made from a book

Doing a goggle image search for an idea for a teacher's Christmas gift I ran across this neat idea from texascottage.blogspot.com. I thought it would be a neat idea for a teacher's gift, I mean what says Teacher more than books and apples!!!

Here's  how I did mine:
First you find a book that you don't mine cutting up. Then remove the front cover and draw & cut out a half of apple shape on to the removed cover.
Apple Ornament made from a book

Use this cut piece as a template to cut the half apple from the book. You need to make sure you place the edge on the spine of the book and not cut this edge.
Apple Ornament made from a book

Use an exacto knife to cut down as far as you can into the book, cutting around the cover as a template.
Apple Ornament made from a book

Continue to flip the cut pages over and cut until you make it all the way through the book.
Apple Ornament made from a book

When done use a scissor to even out the pages and make sure to fold the front page to the back page together make sure that the pieces match, if they don't just trim until they do.
Apple Ornament made from a book

When done it will look like this:
Apple Ornament made from a book

Now is a good time to put the front page and back page together, fan out the pages and see if you need want less pages- really just your preference to how full you want your apple to be.

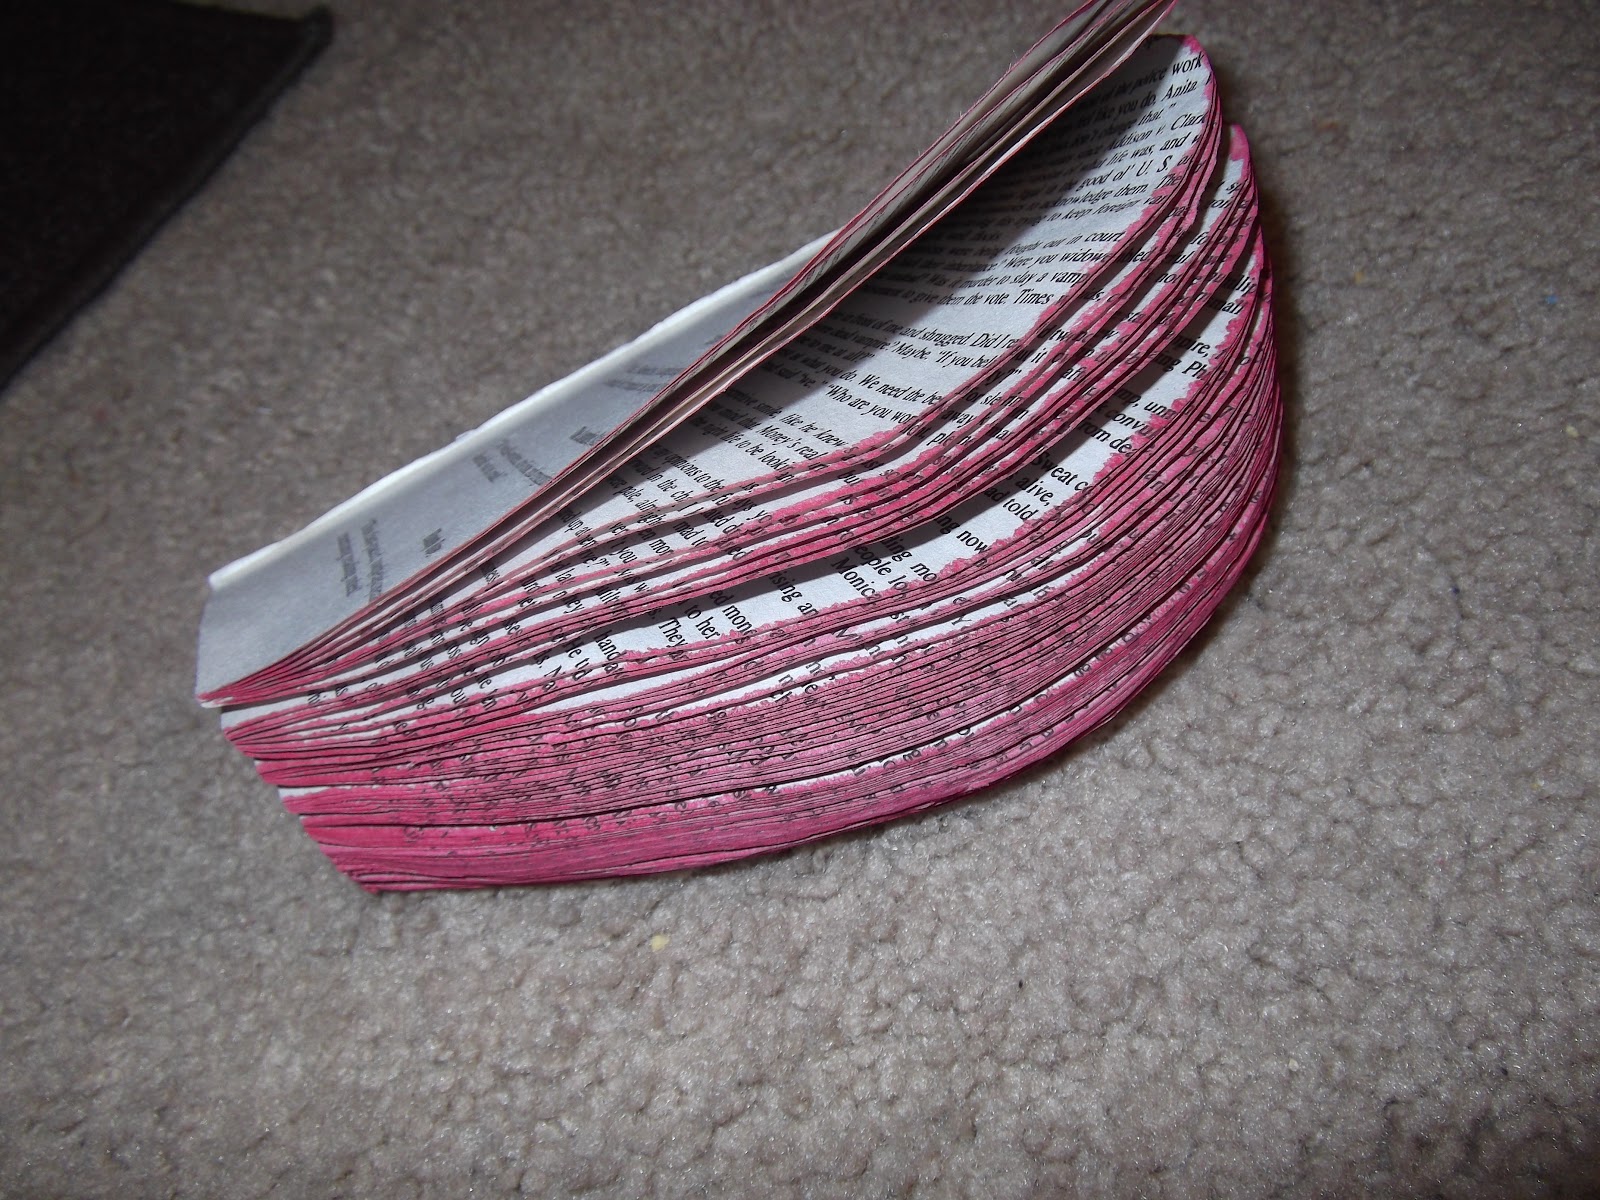
Next I took red acrylic paint and added water to dilute it. The water will make the color lighter and also let the color bleed into the apple. Now hold the book with all the pages together paint the edges.

Apple Ornament made from a book

After painting you need to dry the pages with a blow dryer so they don't stick together. If you let the pages fan out while drying them it makes the pages spread out nice and evenly- I think it is the heat loosening the glue on the spine of the book.
Apple Ornament made from a book


Next glue a piece of stick into the spine of the book. I used fabric glue because I have found it holds really well and it doesn't make the pages wrinkle. Then glue the front and back pages together and hold them closed with paper clips or binder clips. Only glue the front and back pages together but paper clip more than those 2 pages so that the book drys with the pages spread out.

Apple Ornament made from a book

I let mine dry overnight and voila! A finished book apple! I sprayed mine with clear spray varnish to make the pages a little stiffer.
After making this apple I decided that it would be cuter and more practical to make the apple smaller and into an ornament. So I went back and did all these steps but smaller (I actually fit two onto one book)  and then tied a piece of fishing line onto the "stem" so that this could be a Christmas ornament.

Apple Ornament made from a book

I love the finished product & the teachers loved it too! Might be making these for future teachers for years to come!

Apple Ornament made from a book

Tuesday, December 6, 2011

Angry Bird Shoes

Angry Bird Shoes

It's that time again! Christmas is a few weeks away and I am finishing up some of the gifts I am making for friends and family. Here are the Angry Bird Shoes I painted for my niece Kendalyn.


Angry Bird Shoes

Homemade Angry Bird Shoes

She is 13 and a big fan of her cell phone and Angry Bird app. So when I saw these shoes: Angry Bird Shoes I thought they would be perfect for the really hard to shop/make something for, teenage girl.

Handmade Angry Bird Shoes

All I did was sketch out the characters onto the shoes, paint them with fabric paint, then seal them with a clear acrylic spray paint. (Click here if you want to read up on options to seal your painted shoes.)

Handmade Angry Bird Shoes

I am happy with the way they turned out and excited for the next pair I am painting tonight, after my son goes to sleep,.... Adventure Time!

Handmade Angry Bird Shoes

Monday, December 5, 2011

Mother Bird Nest Necklace

Mother Bird Nest Necklace

I have been seeing these Bird Nest Necklaces around lately and thought they were really neat! So I was pleasantly surprised when on pinterest one afternoon I found a tutorial on Sarah Ortega's website to make my own.

Handmade Mother Bird Nest Necklace

Off I went to hobby lobby for supplies- chain, 24 gauge silver wire (I also got bronze because it will look more like brown twigs but decided to make my first nest with the silver since it matched the chain) and your choice of beads.
Follow this tutorial here: DIY Nest Necklace

DIY Mother Bird Necklace

I put 3 eggs in my nest since I have 3 birds. I started off putting the eggs in the color of their birth stones but with 2 blue and one pink (March and October) it looked like I had 2 boys and a girl (I have 2 girls and a boy) so I just picked some colors I liked that complimented each other. I think I will make some more of these charms for Christmas gifts this year!

Mother Bird Nest Tutorial
(Back of the charm.)

Eggs in Bird Nest Necklace

Tuesday, November 15, 2011

Little Waldorf Doll "Jaden" in her Soccer Uniform

Here is the second Waldorf Doll that I made... If you want to see the first one click here.
This one belongs to my middle daughter Jaden. Jaden named her doll "Little Jaden," they do kind-of look alike!


After accomplishing the massive task of creating these dolls I found myself with 2 naked dolls.... I needed clothes! So I made the dolls some simple white t-shirt and blue jeans, their "everyday wear" (you can see it here.) But special dolls need special outfits so I thought it would be cute if "Little Jaden" had a soccer uniform like big Jaden.


After making the shirt and shorts I realized that it needed more... shoes! So I crocheted some socks and shoes for her. And painted the soccer ball on to the shirt with fabric paint.


 I made a couple more dolls and are selling them on Esty. I plan on making some clothes for the dolls and selling them separately so keep checking!


Now both Jaden's are ready to play ball!!


Aren't they cute!!


She loves Little Jaden! Up next is to make both Sally and Little Jaden some night gowns- I was informed tonight that Little Jaden shouldn't be sleeping in her blue jeans, so stay tuned! 

Saturday, November 12, 2011

A Strawberry Shortcake Birthday

My middle child, my baby girl had her 4th birthday right before Halloween. I made her a dress for her birthday photos (you can see it here) but the dress was inappropriate for a party at Chuck E. Cheese so I thought I would make her a shirt to match the theme of her party, Strawberry Shortcake.

Girl in Strawberry Shortcake Applique T-Shirt with birthday cake

Here is how I did the shirt:

Strawberry Shortcake Applique T-Shirt

First I traced a Strawberry Shortcake from Jaden's coloring book.

Strawberry Shortcake Applique T-Shirt Design

I reversed the image and traced out the color sections on to the fusible interfacing then ironed it onto the felt and the felt pieces onto the shirt before I zig-zaged along all the raw edges with the appropriate color thread. If you need a photo tutorial on how to do this you can see/read it here.

Strawberry Shortcake Applique T-Shirt

The face details were so small that I thought I would try painting them. I think it turned out good!! I was worried that the detailed painting matched with the chunky zig-zag stitching would look funny but I think that it made her more recognizable because I didn't have to compromise details.

Strawberry Shortcake Applique T-Shirt

Jaden was thrilled with it so that is all that matters!

Girl wearing Strawberry Shortcake Applique T-Shirt

I think I am getting better at appliqueing! Here are some of my past creations: Gerald & Piggy, Owl Sweatshirt, Soccer ball T-Shirt, and Jay Bird Soccer bag.

Next, the cake...

Homemade Strawberry Shortcake Cake

Again I used Jaden's coloring book and traced out the image onto the iced cake. Then I just outlined the image with chocolate icing and then filled it in.

Homemade Strawberry Shortcake Cake

Tasted good, too!  Happy Birthday Jaden!

Girl in Strawberry Shortcake T-shirt Birthday Cake

Girl in Strawberry Shortcake T-shirt Birthday Cake


Sunday, November 6, 2011

Simplicity Pattern 2320

My middle daughter turned 4 right before Halloween. I always take my kids' pictures on their birthday and I like to plan on something special for them to wear because the photo is up on display in our house for a year (and I really hate to look at a photo I am not happy with!!)

Simplicity 2320 Project Runway Girls Dress

For Jaden's birthday this year I made her dress using Simplicity Pattern 2320. It is a project runway pattern, the first I have used, but other than the possible variations you can choose, the pattern is as simple as any Simplicity pattern and easy to understand.

Simplicity 2320 Project Runway Girls Dress

Simplicity 2320 Project Runway Girls Dress
I choose the cap sleeve version but didn't want to do any bow/button/ribbon embellishments on the front panel. After completing the dress I realized that it needed "something." So I opened the seams on the side of the front panel and inserted a belt.

Simplicity 2320 Project Runway Girls Dress

I added the belt not so much for a better fit but just to add a little pop of color. I made the size 4 and it is a little big, which I expect now from Simplicity, but since I am hoping that she will be able to wear this dress in the spring and summer next year I didn't tailor it to her now.

Simplicity 2320 Project Runway Girls Dress

Simplicity 2320 Project Runway Girls Dress


The only thing I dislike about this dress is the arm holes... I think they are a little too big. (see photo?) I am assuming that with the cap sleeves the extra room in the arm holes make the sleeves not too constricting so she is able to lift her arms? It is not a noticeable problem, I just noticed it here in this photo. I might try to make the sleeve holes smaller the next time I use the pattern but I will have her test it out to see if she still has good arm mobility before I finish it.

Simplicity 2320 Project Runway Girls Dress

I reviewed the pattern on Sewing Pattern Review, you can read it here.

I also made a little dress out of the same material for the Waldorf Doll I made for Jaden. She named her doll Little Jaden, not as unique as my youngest name for her doll, Suzy (you can read the blog link here.) I am selling Waldorf Dolls on Esty now, you can take a look at my store here.

Waldorf Doll Dress and Simplicity 2320 Project Runway Dress

Hope ya'll are having a good day!