Showing posts with label Freezer Paper Stencil Painting. Show all posts

Friday, November 8, 2013

A Monster of a Birthday Party

 
My adorable daughter turned 6 right before Halloween. We decided to have a monster party this year...
 
 
With a monster cake...
 
I used marshmallows for the eyes and pre-colored teal frosting so the cake came together quickly.
 
 
I made the girls each a monster bean bag (well they are filled with rice and not beans) I made them just with scraps of felt.


I also made each girl a monster shirt to match their monster bean bag. I got the shirts from the 99cent store and then using my Cricut and freezer paper I painted a monster onto each.
 
 
I sent the girls on a "Monster Hunt" (scavenger hunt where one clue leads to a monster and the next clue) until all the girls had matching monsters. Then they lined up for a bean bag toss...
 
 
I just made the bean bag toss target out of a cardboard box. I used acrylic paint for the body and white & black construction paper for the teeth and eyes.


 Also for the birthday girl I made a Bubble Ruffle Tutu Skirt using this tutorial from the Creative Vault.


The girls had a great time and were all pleased to be leaving with a monster shirt like the birthday girl and a little baby monster to play with.
~Jessica

Friday, August 30, 2013

Freezer Paper Stenciling Team Shirts


I LOVE to design and paint shirts using the freezer paper technique- I think I have made close to 50 shirts at this point but they turn out really cute, they are easy to do, I get the shirts at the dollar store so they are cheap, how can you beat that!
Up next are some practice shirts I made for my daughters' soccer team. I am the coach of the team and thought that we needed some practice shirts.


I designed a retro feeling logo with Adobe Illustrator and cut it out of freezer paper with my cricut.
 
 
Using the cricut makes this a really easy process, even with placing all the insides of the letters and the soccer ball pieces, these shirts come together pretty quickly.

 
Since I got these shirts at the dollar store the whole project cost me less than $10.
 
 
I made myself and my best friend Janie (the assistant coach) both coach's shirts to match the team.


 At least with my freezer paper stenciling addiction I am coming away with some really cute shirts =)

 
~Jessica
Thursday, August 29, 2013

Kickin' Asphalt Shirts for the Diva Dash

 
I ran in my first race last month, it was a 5k obstacle race hosted by Shape Magazine called the Diva Dash.  My sister had signed up and created a team of friends to join her.
 
 
So we made team shirts! I designed the team logo using illustrator and used my cricut to cut out 5 designs from freezer paper.
 
 
Iron the freezer paper on to the shirts and this becomes a stencil to you to brush fabric paint (using a sponge brush)on to.  Let it dry and peal off the paper....

 
I also wanted our names on the back but since they were tank tops my placement was limited so I put our names across our bottoms =)

 
We looked great and had a great time!
 
 
I have really been on a freezer paper stencil kick lately, I just finished my 6 player soccer team's practice shirts also (next post!)
~Jessica

Friday, December 21, 2012

Freezer Paper Stenciling

Freezer Paper Stenciling
 
Ok- so I have been super busy lately and neglected my blog. So I am going to quickly post as many of the projects I finished in the last two months in the next couple posts.
 
Freezer Paper Stenciling
 
First up is my Elemeno Shirts. Aren't they so cute, espically on a preschooler.... guess it is preschooler humor anyways.
 

Freezer Paper Stenciling
 
I found this idea on Pinterest. And entered in the lettering in my Sure Cuts Alot program and cut it out of freezer paper using my Cricut.
 
Freezer Paper Stenciling
 
Up next is the shirts I made for my Jaybird soccer team:
Freezer Paper Stenciling
 
For this shirt I just used an Exacto knife and cut out my design.

Freezer Paper Stenciling
 
When I began my project I was just going to make coach shirts for myself and my friend Janie,
 
Freezer Paper Stenciling
 
but then I went on to make some Jaybird FAN shirts for the parents,

Freezer Paper Stenciling
 
and then I made all the girls team shirts. For the girls' shirts I used the cricut to cut out their names from freezer paper and painted it on to the back of the shirts.

 
When it was all said and done I made 18 shirts!!!
 
And last but not least is the "I Know I Play Like a Girl" shirt:
Freezer Paper Stenciling
 
I designed the shirt using the Sure-Cuts Alot program and cut them out with my Cricut.
 
Freezer Paper Stenciling
 
Iron it on and sponge paint onto the stencil.
 
Freezer Paper Stenciling
 
And *voila* you have a professional looking t-shirt!


Freezer Paper Stenciling
 
Ok- those are the shirts I made, up next are some of the christmas gifts....
 Jessica
 

Thursday, October 4, 2012

Boy's Week

Mario Mushroom Shirt with Straight Leg Plaid Pants
 
This week's sew along challenge for Project Run & Play was creating an outfit for a boy. I love making stuff for my son, but as he gets older I have to check and recheck that I am not doing something that will cause the outfit/bag/etc to be unused and labeled uncool.
So my challenge this week so to create an outfit for my 8 year old son....

Mario Mushroom Shirt with Straight Leg Plaid Pants
 
I used the Peek-A-Boo Pattern Shop's pattern for skinny jeans, thinking they are cool now right? Well, he is 8 but I made a size 10 so that they would be not so skin tight and I a giggling now thinking of his look when I had him try them on =) They were SO tight, an 8 would of never even been pulled on!

Mario Mushroom Shirt with Straight Leg Plaid Pants
 
 
So my fix? I added a tuxedo strip down the side. They increased each of the legs 1.5" and the but/crotch area 3". Now they look more like straight leg pants instead but I got the thumbs up from him and he was able to sit down without busting a seam.

Mario Mushroom Shirt with Straight Leg Plaid Pants
 
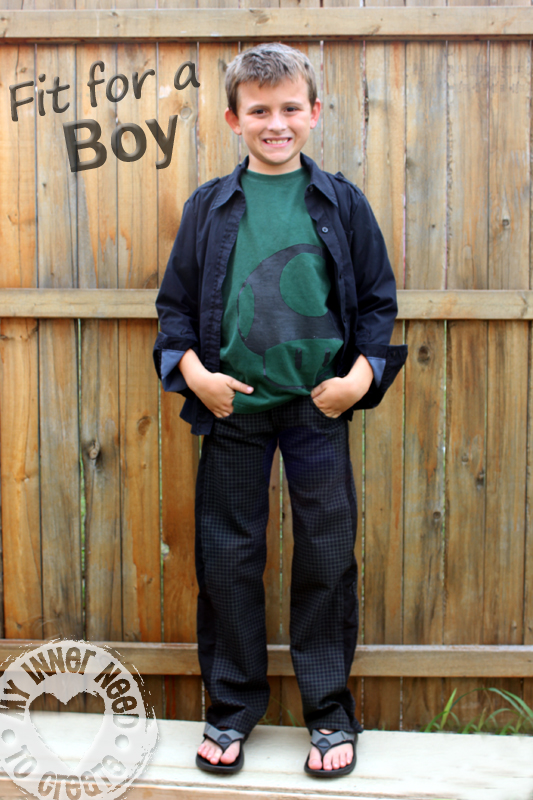
I freezer paper stenciled an understated, over sized Mushroom from Mario onto his shirt.
 
Mario Mushroom Shirt with Straight Leg Plaid Pants
 
His jacket I made by refashioning an old shirt of mine. The hardest part was making the shirts darts into less of a woman's shape and more boxy like a cargo jacket. I fully lined the shirt and added pockets and button flaps onto the shoulders.

Mario Mushroom Shirt with Straight Leg Plaid Pants
 
I wanted to paint or applique something onto the back of the jacket, but like the yellow shirt, my idea was shot down.

Mario Mushroom Shirt with Straight Leg Plaid Pants

Mario Mushroom Shirt with Straight Leg Plaid Pants

Mario Mushroom Shirt with Straight Leg Plaid Pants
 
Check out other Sew-Along participates at the Flickr site.
Have a great day!
~Jessica

Sunday, August 12, 2012

Welcome Baby to the World Shirts

Welcome Baby Freezer Paper Painted Shirts

So my little sister had her baby, a little boy =)
Thinking ahead I came up with this idea to make my whole family shirts to wear to the hospital to welcome the newest addition to the family (I also thought it would make cute photos).

Welcome Baby Freezer Paper Painted Shirts

I headed over to the dollar store and the only color of shirts that ranged in sizes from XS Child to Large Adult were black- but since the sex of the baby was a surprise I thought that black was pretty gender neutral!

Welcome Baby Freezer Paper Painted Shirts

I designed the shirts to not be so cutesy that my husband and Dad wouldn't wear them, and so that we could wear them again.
Here is what I came up with:

Welcome Baby Freezer Paper Painted Shirts

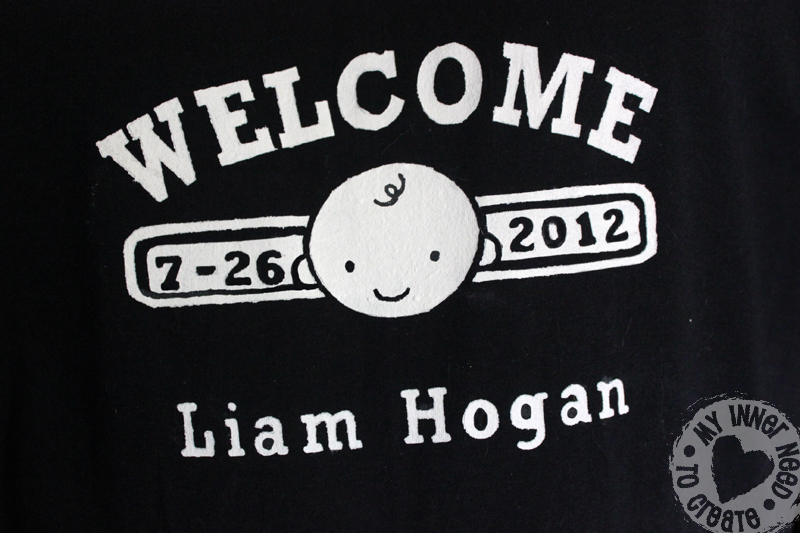
Now because I didn't know when the baby would be born or his name, I split the design into 2 pieces. The part that I could do ahead of time was the Welcome, the baby and the placards on both sides.


I used the freezer paper technique to do the painting, if you don't know about this technique you can check it out here and here. I printed out the pattern in the size I needed and used it to cut out my pieces.


I ironed it on and painted. I left out the eyes and mouth on the baby and just painted them on to the face in black after the white had dried.

Welcome Baby Freezer Paper Painted Shirts


Here is what it looked like after 3 coats of white paint:


Welcome Baby Freezer Paper Painted Shirts

And this is how they sat for weeks waiting on my sister....

Welcome Baby Freezer Paper Painted Shirts

As soon as I got the call about the baby arrival (and his name!) I used my cricut to cut out the date and name from the freezer paper and ironed it on.

Welcome Baby Freezer Paper Painted Shirts

I was in a hurry so I used a blow dryer and spread it on thick to try and hurry things along. 

Welcome Baby Freezer Paper Painted Shirts

They came out fine and the photographs when we met the new little guy turned out great! 

Welcome Baby Freezer Paper Painted Shirts

Welcome Baby Freezer Paper Painted Shirts

I made Liam a shirt also. I bought an extra shirt and used Dana's 90 min shirt tutorial. I forgot to take a photo of his shirt, so this is the best I have:

Welcome Baby Freezer Paper Painted Shirts

His only has the baby and his name.

Welcome Baby Freezer Paper Painted Shirts

I love how they turned out and how everyone who saw our group wandering through the hospital knew why we were there and how excited we were.
Hope y'all are having a great weekend!