Showing posts with label art. Show all posts

Tuesday, April 23, 2013

Just Monkeying Around!

 
My youngest daughter's room I am slowly in the process of completing her transition into big girl room. I found myself really busy this year with a lot of volunteer opportunities and going to get my teaching certificate that I haven't had much time to spend blogging or completing the 50 tasks I have planned out for home improvement and decorating projects around the house. I finally finished the art work for her walls though.... Monkeys!


I just painted them with acrylic paint on canvas, 11 X 17.
They add a nice whimsical touch to the room and with some art on the walls the room already looks more complete.... now to refinish her chest of drawers.
Jessica

Thursday, January 26, 2012

Brown and Pink Butterfly and Flower Mural


I painted another plywood mural this time for my daughters room. Here is the post of my other huge plywood paintings: Damask Painting.  My daughter Jaden's room is painted a brownish/pink (I think the color was called Hot Coco but I swear it is pink, just not nauseatingly pink) she has a huge blank wall behind her bed. I wanted to paint a mural on it but I know how many coats of paint and primer that you need to apply to cover up a old mural and it will be much easier to change when she gets tired of butterflies.

 I cut a thin piece of plywood 3 feet by 6 feet and drew out a design onto the board with pencil.


Next you paint the background of the board. You might need to redraw some of your lines. I just used acrylic paint that you can find anywhere, even Wal-Mart.


Next you paint the design. It is easier if you have a solid color background so if you make a mistake you can easily cover it up, so if you have a gradient background be extra careful because it is really hard to fix a mistake.


And there you have it! A huge painted mural, cheaper than a huge canvas painting and easier to change out than a wall mural.


I would include a photo of her room except in true Jaden fashion it looks like a tornado fit it today.
Hope you all are having a great day!


Tuesday, December 6, 2011

Angry Bird Shoes

Angry Bird Shoes

It's that time again! Christmas is a few weeks away and I am finishing up some of the gifts I am making for friends and family. Here are the Angry Bird Shoes I painted for my niece Kendalyn.


Angry Bird Shoes

Homemade Angry Bird Shoes

She is 13 and a big fan of her cell phone and Angry Bird app. So when I saw these shoes: Angry Bird Shoes I thought they would be perfect for the really hard to shop/make something for, teenage girl.

Handmade Angry Bird Shoes

All I did was sketch out the characters onto the shoes, paint them with fabric paint, then seal them with a clear acrylic spray paint. (Click here if you want to read up on options to seal your painted shoes.)

Handmade Angry Bird Shoes

I am happy with the way they turned out and excited for the next pair I am painting tonight, after my son goes to sleep,.... Adventure Time!

Handmade Angry Bird Shoes

Wednesday, September 28, 2011

Painted Pattern Artwork

Since I am a stay-at-home mother with 3 small children, living off of one income, I like to give gifts that require more of my time and thought than money. But I find it hard to make homemade gifts for adults...

Here was my solution for a birthday present for a dear friend this week: small canvas artwork.  Since art is so subjective I thought that a nice pattern would be a nice subject matter, And I picked  a size that could be hung anywhere, but not necessarily be the main piece of art in her house.


I had done some damask inspired paintings for my bedroom a couple years ago. They are 3 of them and actually they are quite big: 2 ft by 4 ft. I painted them onto thin plywood and screwed them into the wall.


Our bedroom is huge and the wall that you see when entering the room was just a huge blank space so these painting span the entire width of the room.


So I did these painting the same way I did the smaller canvas ones:
First I drew out the pattern on a sheet of paper.


Then you turn it over and using a pencil, color the whole back side.


Then all you have to do is lay it on the canvas and trace over the pattern. The lead from the back side will rub off onto the canvas and leave a faint mark. (of course if you are doing a bigger piece of art you will have to move your paper, relining it up and tracing again and again, I recommend tracing paper for that).


Now all you have to do is paint it in. Yes, it is a slow process with a little brush but the outcome is gorgeous!

I paired it with a bag I found at Target with the same pattern and a sewn fabric covered card.

Sunday, June 26, 2011

Baby Gift- Blanket & Nursery Name Art

Personalized Hankerchief Baby Blanket

Personalized Nursery Name Art

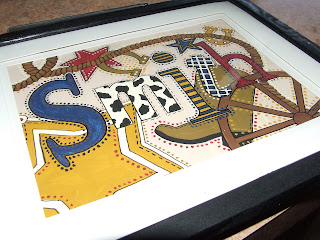
Ok, so my husband's cousin had a baby this last week. I had already painted a nursery name art work, click here to see the post, but they changed their mind on the baby's name at the last minute and I had to start again. I used the tutorial from Lil Blue Boo for the idea and here's how my second one came out:
Personalized Hankerchief Baby Blanket


Since the nursery theme is cowboy I tried to incorporate the theme into not only the name art but also a baby blanket. I used navy blue fleece on one side and a light weight, soft, quilters denim for the other side. I embroidered the name and appliqued a "J" on to the denim before sewing the fleece and denim together so it can't be seen on the underside.

Personalized Hankerchief Baby Blanket

Next I took a bandanna and cut it into strips.

Personalized Hankerchief Baby Blanket

I took these strips and folding the raw edges under, sewed a border around the blanket.

Personalized Hankerchief Baby Blanket
Personilized Nursery Name Art

Thursday, May 26, 2011

Personalized Nursery Art


So I have painted a few murals and smaller nursery art for the walls of not only my own kids rooms but also for some family and friends. Here are a few of my favorites:


So when I saw the Lil Blue Boo post of Personalized Nursery Art I thought it would be right up my ally. So for a (kind-of) sister-in-law (she is my husband's cousin's wife) who has already decorated her nursery I thought the smaller sized personalized art piece would be a great addition to my gift for baby Smith.

Instead of using hardboard which would cause me to use a saw and drill, I used smooth Bristol board which is easier to cut and punch holes in. Then I just used acrylic paints and a very thin paint brush!!

Thanks for the great idea Lil Blue Boo!